Android アプリのレイアウトを勉強する(1)
- 2014/08/22
- てっちゃん

こんにちは、デザイナーのてっちゃんです。
最近は、タイトルに連番を付けてブログを続けていくライフハックを実践中。
苦しくならないうちにクロージングしようと思います。
っと、言いながらも今回もつけてしまいました。
今回はAndroidアプリを制作するときのレイアウト作るとき必要な情報を紹介していきます。
アプリの中でもレイアウトはデザイナーも係る大事な部分です。
構造はHTML・CSSに似ているのでコーディングが出来るデザイナーであれば比較的学習コストは低いと思います。
なぜデザイナーがレイアウトを?
おそらく他社でもだいたい同じだと思いますが弊社ではプログラマーがAndroidアプリのレイアウトを制作しています。
先程も述べた用にレイアウトにはXML形式で書いていくのでHMTL・CSSに似ているため、普段から行っているデザイナーが行うほうが効率的であり、クオリティも担保できます。プログラマーはレイアウト以外に集中できるので開発のスピードが上がると思います。
Android studioのダウンロード
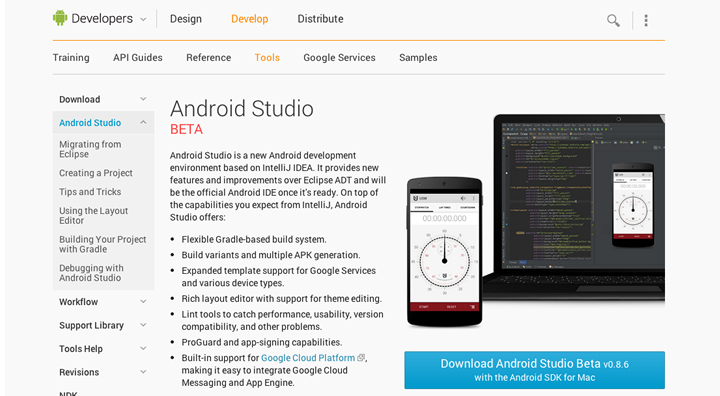
Androidアプリを制作するにはまず専用のアプリケーションをダウンロードします。
弊社のプログラマーに教えてもらったAndroid studioを使って制作します。
詳しい内容は書きませんが、インストーラーを進んでいけば無事にインストールできます。
XMLでレイアウトを構築
XMLファイルなので、宣言文を書きその下にレイアウトの記述を書いていきます。
レイアウトを構築するのに、テキスト、画像、ボタンなどの様々なViewがありますが、これらは、ViewGroupと呼ばれるビューに入れていく必要があります。
|
1 2 3 4 5 |
<?xml version="1.0" encoding="utf-8"?> <ViewGroup> <View /> <View /> </ViewGroup> |
ViewGroupに様々な種類があり、それぞれ用途が違います。
- Linear Layout
- 縦向きまたは横向きに一直線にウィジェットを並べるレイアウト
- Relative Layout
- 相対的な位置指定をするレイアウト。また,上端や下端にレイアウトするといった指定を行うことも可能
- Absolute layout
- 配置を「絶対座標」で指定するレイアウト。
- Table layout
- View (テキスト・画像・ボタン等) を表形式でレイアウトするためのものです
- Frame layout
- 後から配置したウィジェットが前面に描画されるレイアウト
よく使うViewの用途は以下になっています。
- ListView
- リストとして並べるレイアウト
- GridView
- データをグリッド状(格子状)に表示するためのビュー
- TextView
- テキスト表示するためのビュー
- ImageView
- 画像を表示するためのビュー
ルート要素
XML宣言の次に来るViewGroupはルート要素と呼ばれるものです。これは一番外側の要素で他の要素は全てルート要素の中に記述されます。複数のビューを使用する場合、必ずViewGroupの中に配置する必要があるので、ルート要素は上記にあてたいずれかのViewGroupとなります。
|
1 2 3 4 5 6 7 8 |
<?xml version="1.0" encoding="utf-8"?> <ルート要素> <View /> <View /> <ViewGroup> <View /> </ViewGroup> </ルート要素> |
ルート要素にはお約束として「xmlns:android」属性に対して「http://schemas.android.com/apk/res/android」を必ず設定する必要があります。Androidのレイアウト用として定義されている「height」なのかHTMLなのかが区別できないのでそれを区別するための識別子です。
|
1 2 3 4 5 6 7 8 9 10 11 12 |
<?xml version="1.0" encoding="utf-8"?> <LinearLayout xmlns:android="http://schemas.android.com/apk/res/android" android:layout_width="fill_parent" android:layout_height="fill_parent" android:orientation="vertical" > <TextView android:layout_width="fill_parent" android:layout_height="wrap_content" android:text="@string/hello" /> </LinearLayout> |
ViewGroupで頻繁に使うLinear LayoutとRelative Layoutを説明していきます。
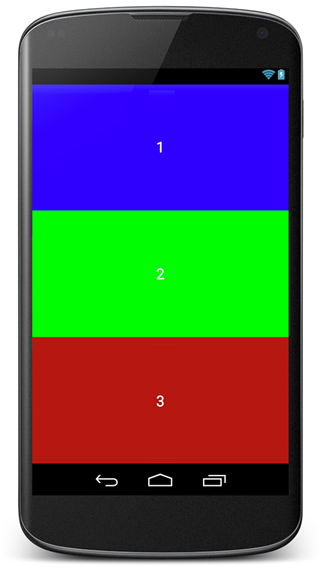
Linear Layout
横に並べるにはandroid:orientation="horizontal"と指定します。
また、画面いっぱいに分割することも可能で、android:layout_weight="1"で画面を自動で分割してくれるので、このへんはHTML・CSSより楽ですね。
|
1 2 3 4 5 6 7 8 9 10 11 12 13 14 15 16 17 18 19 20 21 22 23 24 25 26 27 28 29 30 31 32 33 34 35 36 37 |
<?xml version="1.0" encoding="utf-8"?> <LinearLayout xmlns:android="http://schemas.android.com/apk/res/android" android:orientation="horizontal" android:layout_width="fill_parent" android:layout_height="fill_parent"> <TextView android:layout_width="fill_parent" android:layout_height="50dp" android:layout_weight="1" android:text="1" android:textSize="22sp" android:textColor="#fff" android:gravity="center" android:background="#0000ff" /> <TextView android:layout_width="fill_parent" android:layout_height="50dp" android:text="2" android:textSize="22sp" android:textColor="#fff" android:gravity="center" android:background="#00ff00" android:layout_weight="1" /> <TextView android:layout_width="fill_parent" android:layout_height="50dp" android:text="3" android:textSize="22sp" android:textColor="#fff" android:gravity="center" android:background="#aa0000" android:layout_weight="1" /> </linerLayout> |

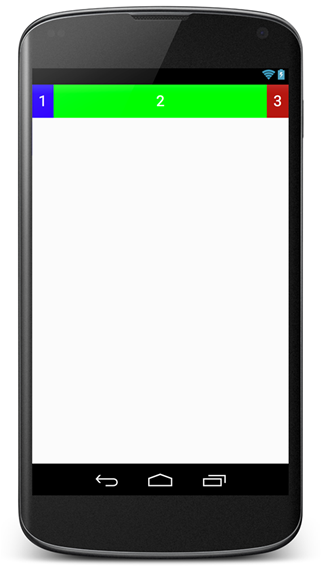
縦に並べるときはandroid:orientation="vertical"と指定します。
当然縦でも分割してくれます。
|
1 2 3 4 5 6 7 8 9 10 11 12 13 14 15 16 17 18 19 20 21 22 23 24 25 26 27 28 29 30 31 32 33 34 35 36 37 |
<?xml version="1.0" encoding="utf-8"?> <LinearLayout xmlns:android="http://schemas.android.com/apk/res/android" android:orientation="vertical" android:layout_width="fill_parent" android:layout_height="fill_parent"> <TextView android:layout_width="fill_parent" android:layout_height="wrap_content" android:layout_weight="1" android:text="1" android:textSize="22sp" android:textColor="#fff" android:gravity="center" android:background="#0000ff" /> <TextView android:layout_width="fill_parent" android:layout_height="wrap_content" android:text="2" android:textSize="22sp" android:textColor="#fff" android:gravity="center" android:background="#00ff00" android:layout_weight="1" /> <TextView android:layout_width="fill_parent" android:layout_height="wrap_content" android:text="3" android:textSize="22sp" android:textColor="#fff" android:gravity="center" android:background="#aa0000" android:layout_weight="1" /> </linerLayout> |
共通で使える各種の細かい説明はこちら
| 要素名 | 説明 |
|---|---|
| android:layout_width | 横幅 |
| android:layout_height | 縦幅 |
| android:layout_weight | 親ビューの余った余白を指定したwegihtの割合で分割されます。数字で指定します。 |
| fill_parent/match_parent | cssで言うところのdisplay:blockの状態で横いっぱいに広がります。 |
| wrap_content | cssで言うところのdisplay:inlineの状態でコンテンツの横幅に合わせた状態になります。 |
| android:text | テキスト |
| android:textSize | テキストのサイズ |
| android:background | 背景色 |
| sp(Scale-independent Pixels) | 画面上のサイズはユーザのフォントサイズ設定に準じます。 |
| dp(Density-independent Pixels) | ディスプレイ解像度の物理的な密度に応じた抽象単位になります。 |
| android:gravity | 位置の指定をする事が出来ます。オブジェクトの配置場所を変えるための指定です。 |
Relative Layout
相対的なレイアウトを作ることが出来ます。
各要素にid android:id="@+id/text1"をふってandroid:layout_toLeftOfで相対的な位置を指定しています。
- android:layout_toEndOf : 下からの相対的な位置
- android:layout_toLeftOf : 左からの相対的な位置
- android:layout_toRightOf : 右からの相対的な位置
- android:layout_toStartOf : 上からの相対的な位置
|
1 2 3 4 5 6 7 8 9 10 11 12 13 14 15 16 17 18 19 20 21 22 23 24 25 26 27 28 29 30 31 32 33 34 35 36 37 38 39 40 41 42 43 44 45 46 47 |
<?xml version="1.0" encoding="utf-8"?> <RelativeLayout xmlns:android="http://schemas.android.com/apk/res/android" android:layout_width="fill_parent" android:layout_height="fill_parent"> <TextView android:text="1" android:id="@+id/text1" android:layout_width="wrap_content" android:layout_height="50dp" android:layout_alignParentTop="true" android:layout_alignParentLeft="true" android:textSize="22sp" android:paddingLeft="20px" android:paddingRight="20px" android:textColor="#fff" android:gravity="center" android:background="#0000ff" /> <TextView android:text="2" android:id="@+id/text2" android:layout_width="fill_parent" android:layout_height="50dp" android:layout_alignParentTop="true" android:layout_toLeftOf="@+id/text3" android:layout_toRightOf="@+id/text1" android:textSize="22sp" android:textColor="#fff" android:gravity="center" android:background="#00ff00" /> <TextView android:text="3" android:id="@+id/text3" android:layout_width="wrap_content" android:layout_height="50dp" android:layout_alignParentTop="true" android:layout_alignParentRight="true" android:paddingLeft="20px" android:paddingRight="20px" android:textSize="22sp" android:textColor="#fff" android:gravity="center" android:background="#aa0000" /> </RelativeLayout> |
こんな感じで、よく使うLinear LayoutとRelative Layoutで色々できそうなことがわかっていただけかと思います。
今回はここまでですか、紹介した通りVeiwは他にもあるで、次回以降掘り下げていたらと思っています。
新しいことをやるのはいつでも楽しいですね!
次回は...
ここまでやってフロントエンドやコードがある程度わかる人であれば親和性が高い事がわかると思います。
是非、興味を持ったら自分でやってみてください。次回は引き続きVeiwの説明をしていき、最終的には実際にアプリになっているレイアウトを作っていこうと思います。