Android アプリのレイアウトを勉強する(2)
- 2014/10/13
- てっちゃん
こんには、てっちゃんです。
先日、社内エンジニア主催のAndroidレイアウトの作り方ワークショップで勉強してきました。レイアウトがどんどん出来ていくのはホント楽しいですね!
前回に引き続き2回目のAndroidレイアウトを行っていきます。
前回からちょっと間が空いているので、内容を忘れてしまった方はもう一度こちらの記事を読んでおいてください。
Android アプリのレイアウトを勉強する(1)
http://creator.aainc.co.jp/archives/5460
今回学ぶレイアウト
Absolute layout
配置を「絶対座標」で指定するレイアウト。
Table layout
View (テキスト・画像・ボタン等) を表形式でレイアウトするためのものです
Frame layout
Vierを重ねることができます。後から配置したウィジェットが前面に描画されるレイアウト
それぞれよく使うレイアウトのなので前回と個々ができればほぼレイアウトは組めるようになります。
では、早速作っていきましょう。
Absolute layout
絶対座標で配置するレイアウトですが、SDK1.5以降、非推奨になっています。
解像度の違う端末が多すぎるため絶対座標で配置はあまり向いていません。
どうしても必要な場合は前回紹介したRelative Layoutで代用できます。
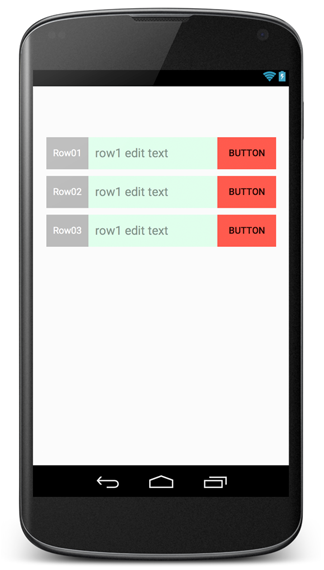
Table layout
こちらは名前通りテーブルを作るためのレイアウトです。
HTMLのtable要素に似ているのでわかりやすいと思います。
属性の説明は以下になります。
| 要素名 | 説明 |
|---|---|
| shrinkColumns | 折り返してでも狭いスペースでコンテンツを表現しようとする。カンマ区切りで複数の列を指定できる。指定は0からはじめる。 |
| stretchColumns | カラム幅を広げたい場合に指定。指定すると余白部分が割り当てられ、行の開いているスペースいっぱいの空間を取ろうとする。カンマ区切りで複数の列を指定できる。指定は0からはじめる。 |
| layout_span | HTMLのcolspanと同等。列を複数に拡大する。 |
| layout_column | 指定した列にウィジェットを配置する。 |
|
1 2 3 4 5 6 7 8 9 10 11 12 13 14 15 16 17 18 19 20 21 22 23 24 25 26 27 28 29 30 31 32 33 34 35 36 37 38 39 40 41 42 43 44 45 46 47 48 49 50 51 52 53 54 55 56 57 58 59 |
<?xml version="1.0" encoding="utf-8"?> <RelativeLayout xmlns:android="http://schemas.android.com/apk/res/android" android:layout_width="fill_parent" android:layout_height="fill_parent"> <TableLayout android:layout_width="match_parent" android:layout_height="wrap_content" android:layout_margin="20dp" android:stretchColumns="1"> <TableRow> <TextView android:text="Row01" android:id="@+id/" android:background="#ffadadad" android:textColor="#ffffffff" android:layout_height="match_parent" android:gravity="center_vertical|center_horizontal" android:padding="10dp" /> <EditText android:hint="row1 edit text " android:background="#ffdaffe8" android:layout_height="match_parent" android:padding="10dp" /> <Button android:text="Button" android:background="#ffff413d" /> </TableRow> <TableRow android:layout_marginTop="10dp"> <TextView android:text="Row02" android:id="@+id/" android:layout_height="match_parent" android:background="#ffadadad" android:textColor="#ffffffff" android:padding="10dp" android:gravity="center_vertical" /> <EditText android:hint="row1 edit text " android:background="#ffdaffe8" android:layout_height="match_parent" android:padding="10dp" /> <Button android:text="BUTTON" android:id="@+id/" android:background="#ffff413d" /> </TableRow> <TableRow android:layout_marginTop="10dp"> <TextView android:text="Row03" android:id="@+id/" android:background="#ffadadad" android:layout_height="match_parent" android:textColor="#ffffffff" android:gravity="center_vertical" android:padding="10dp" /> <EditText android:hint="row1 edit text " android:background="#ffdaffe8" android:layout_height="match_parent" android:padding="10dp" /> <Button android:text="BUTTON" android:id="@+id/" android:background="#ffff413d" /> </TableRow> </TableLayout> </RelativeLayout> |
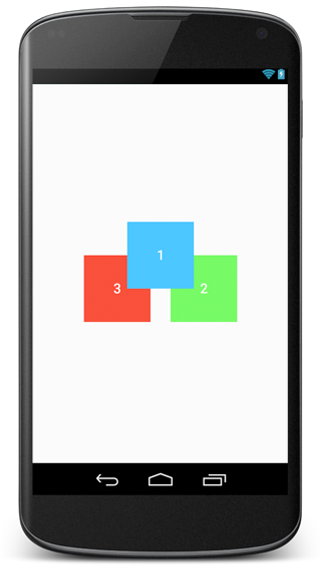
Frame layout
HTMLで言うところのposition:absoluteに近いところがあります。基点は左上で後に配置したものが上になります。AndroidではこれいがにVeiwを重ねることが出来ないので、重宝するレイアウトになっています。
|
1 2 3 4 5 6 7 8 9 10 11 12 13 14 15 16 17 18 19 20 21 22 23 24 25 26 27 28 29 30 31 32 33 34 35 36 37 38 39 40 41 42 43 44 45 46 47 48 49 |
<?xml version="1.0" encoding="utf-8"?> <RelativeLayout xmlns:android="http://schemas.android.com/apk/res/android" android:layout_width="fill_parent" android:layout_height="fill_parent"> <FrameLayout android:layout_width="match_parent" android:layout_height="match_parent" android:layout_centerHorizontal="true" android:paddingTop="150dp"> <TextView android:layout_width="100dp" android:layout_height="100dp" android:text="3" android:id="@+id/textView4" android:layout_gravity="center_horizontal" android:background="#ffff372e" android:layout_marginRight="65dp" android:gravity="center_vertical|center_horizontal" android:textColor="#ffffffff" android:textSize="20sp" android:layout_marginTop="50dp" /> <TextView android:layout_width="100dp" android:layout_height="100dp" android:text="2" android:id="@+id/textView5" android:layout_gravity="center_horizontal" android:background="#ff6aff54" android:textSize="20sp" android:textColor="#ffffffff" android:gravity="center_vertical|center_horizontal" android:layout_marginLeft="65dp" android:layout_marginTop="50dp" /> <TextView android:layout_width="100dp" android:layout_height="100dp" android:text="1" android:id="@+id/textView6" android:layout_gravity="center_horizontal" android:background="#ff41baff" android:gravity="center_vertical|center_horizontal" android:textColor="#ffffffff" android:textSize="20sp" /> </FrameLayout> </RelativeLayout> |
次回こそ
今回は2つのレイアウトをご紹介しました。だいたいのレイアウトのはご紹介できたので、次回は実際のレイアウトをデザインを見ながら作っていきます。今回まではレイアウトにフォーカスをしていきましたので実際のレイアウトをみなら細かいテクニックもまとめていきたいと思います。